class는 공통적인 속성을 모아 하나로 묶은 것으로 설명할 수 있습니다.
class와 함께 등장하는 용어로 인스턴스가 있습니다. 인스턴스는 해당 클래스의 속성을 지닌 구체적인 객체들입니다.
정리해보겠습니다.
클래스: 인스턴스들의 공통 속성을 모은 추상적인 개념
인스턴스: 공통된 속성을 지니는 구체적인 대상
앞시간에서 설명한 프로토타입을 예로 들면 Array와 프로퍼티, 메서드가 calss에 해당할 것이고 인스턴스가 여기서도 인스턴스에 해당하게 됩니다.
Array의 프로퍼티 중 프로토타입 프로퍼티 내부에 할당되지 않고 Array 생성자함수 객체에 직접 할당되어 있는 프로퍼티들을 static methods, static properties라고 합니다. 이들은 new연산자 없이 함수로써 호출할 때만 의미가 있는 값입니다. 프로토타입에 있는 함수들은 프로토타입 메서드, 그냥 메서드라고 합니다.
인스턴스에서 이들에게 접근하려고 할 때 메서드는 [[Prototype]]에 의해 바로 접근이 가능한 반면 스태틱 메서드, 프로퍼티는 다이렉트로 접근할 방법이 없습니다. 그래서 인스턴스가 아닌 생성자 함수에서 직접 접근해야 합니다.
// Person은 생성자 함수, roy는 Person의 인스턴스
//getInformations 스태틱 메서드
//getName, getAge 메서드

console.log(roy.getName()); // 가능
console.log(roy.getAge()); // 가능

console.log(roy.getInformations(roy)); // 에러

console.log(Person.getInformations(roy)); //가능(생성자함수에서 접근)
정리해보면 class는 어떤 공통된 속성이나 기능을 정의한 추상적인 개념이고, 클래스에 속한 객체를 인스턴스라고 합니다. 클래스에는 인스턴스에서 직접 접근할 수 없는 클래스 자체에서만 접근 가능한 스태틱 메서드, 프로퍼티와 인스턴스에서 직접 활용할 수 있는 프로토타입 메서드가 있습니다.
2. 클래스 상속
function Person(name, age) {
	this.name = name || '이름없음';
    this.age = age || '나이모름';
}

Person.protoype.getName = function() {
	return this.name;
}
Person.rpototype.getAge = function() {
	return this.age;
}


function Employee(name, age, position) {
	this.name = name || '이름없음';
    this.age = age || '나이모름';
    this.position = position || '직책모름';
}
Employee.protoype.getName = function() {
	return this.name;
}
Employee.rpototype.getAge = function() {
	return this.age;
}
Employee.prototype.getPosition = function(){
	return this.position;
}
Person, Employee 2개의 클래스가 각각 메서드를 사용하는데 2개가 겹치고 있습니다. 이를 해결하기 위해 Person 하위 클래스로 Employee을 두어 getName(), getAge()를 참조해 사용하면 Employee에는 겹치지 않는 메서드만 남겨 반복을 하지 않아도 됩니다.
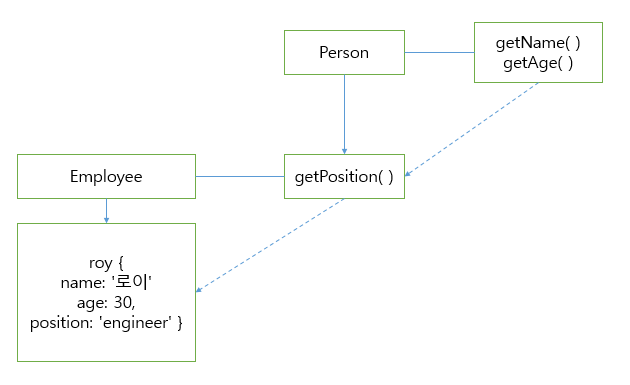
그렇다면 이런 다중 상속 구조를 코드로 어떻게 만들어야 할까요?
위의 getPosition()을 코드로 나타내면 다음과 같습니다.
Employee.prototype = new Person()
Employee의 프로토타입에 Person의 인스턴스를 할당하면 됩니다. 다만 이것만으로는 부족합니다. 이 코드는 기존의 employee에 person으로 덮어씌워 새로운 객체로 만들어버리기 때문입니다.
그래서 본래 갖고 있던 기능을 다시 부여해 줄 필요가 있습니다.
Employee.prototype.constructor = Employee
이렇게 하면 서로 다른 두 개의 클래스가 슈퍼클래스(상위 클래스), 서브클래스(하위 클래스) 관계를 갖게 됩니다.
그럼 지금까지 설명했던 내용들을 바탕으로 코드를 작성해보겠습니다.
function Person(name, age) {
	this.name = name || '이름없음';
    this.age = age || '나이모름';
}

Person.prototype.getName = function() {
	return this.name;
}
Person.prototype.getAge = function() {
	return this.age;
}


function Employee(name, age, position) {
	this.name = name || '이름없음';
    this.age = age || '나이모름';
    this.position = position || '직책모름';
}

Employee.prototype = new Person();
Employee.prototype.constructor = Employee;
Employee.prototype.getPosition = function() {
	return this.position;
}

var roy = new Employee('로이', 30, 'engineeer');
console.dir(roy);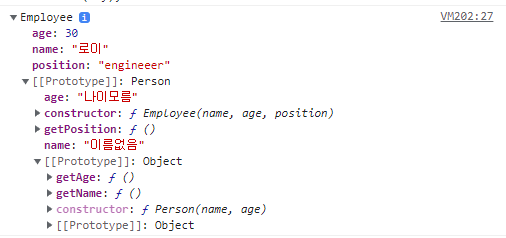
프로토타입 체이닝 상에는 프로퍼티가 아닌 메소드들만 존재해야 합니다. 그런데 위 코드는 Employee.prototype에 name: '이름없음', age: '나이모름'이 담겨있습니다. 만약 employee에 name값을 주지 않고 실행시킨다면 undefined가 나오지 않고 프로토타입 체이닝으로 person의 프로토타입에 있는 name을 가져와 "이름 없음"을 반환합니다.
이는 우리가 원하는 결과가 아니기 때문에 Person의 프로토타입에 있는 name, age 프로퍼티를 지우겠습니다.
생각해보면 우리가 필요한 것은 프로토타입이지 인스턴스가 필요한 것이 아닙니다. 그래서 Person과 Employee를 연결하는 중간에 빈 객체인 Bridge를 넣어 프로토타입만을 전해줍니다.
이를 코드로 나타내보면 다음과 같습니다.
Bridge.prototype = Person.prototype
Employee.prototype = new Bridge() //원래는 Person의 인스턴스를 넣은 대신 Bridge (빈 객체) 넣음
Employee.prototype.constructor = Employee // Constructor를 연결
그러면 이제 앞서 Person과 Employee를 사용했던 코드를 Bridge를 활용해 다시 작성해보겠습니다.
function Person(name, age) {
	this.name = name || '이름없음';
    this.age = age || '나이모름';
}

Person.prototype.getName = function() {
	return this.name;
}
Person.prototype.getAge = function() {
	return this.age;
}


function Employee(name, age, position) {
	this.name = name || '이름없음';
    this.age = age || '나이모름';
    this.position = position || '직책모름';
}

function Bridge() {}
Bridge.prototype = Person.prototype;
Employee.prototype = new Bridge();
Employee.prototype.constructor = Employee;
Employee.prototype.getPosition = function(){
	return this.posititon;
}

var roy = new Employee('로이', 30, 'engineeer');
console.dir(roy);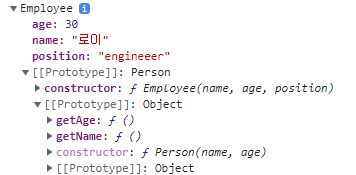
Bridge를 이용해 Person의 인스턴스와의 연결 관계를 끊음으로써 프로토타입 체인 상에 불필요한 프로퍼티가 등장하지 않게 만들었습니다. 그런데 이 기능은 EX5 시스템에서 클래스 상속을 구현하는데 자주 등장하는 패턴이며 Bridge라는 함수는 매개체일뿐 실제 코드상에 영향을 주는 녀석이 아니기 때문에 다음과 같이 함수화해서 사용하는 것을 추천하고 있습니다.
var extendClass = (function() {
	function Bridge(){}
    return function(Parent, Child) {
    	Bridge.prototype = Parent.prototype;
        Child.prototype = new Bridge();
        Child.prototype.constructor = Child;
	}
})();
이 코드는 클로저를 이용해서 Bridge 생성자함수를 한 번만 생성해 재활용하고 super와 sub 클래스로 쓰일 생성자함수를 매개변수로 넘겨주면 자동으로 둘 사이의 상속 구조를 연결해주는 함수입니다.
이것을 이용해서 코드를 다시 짜보겠습니다.
function Person(name, age) {
	this.name = name || '이름없음';
    this.age = age || '나이모름';
}

Person.prototype.getName = function() {
	return this.name;
}
Person.prototype.getAge = function() {
	return this.age;
}


function Employee(name, age, position) {
	this.name = name || '이름없음';
    this.age = age || '나이모름';
    this.position = position || '직책모름';
}

var extendClass = (function() {
	function Bridge(){}
    return function(Parent, Child) {
    Bridge.prototype = Parent.prototype;
    Child.prototype = new Bridge;
    Child.prototype.constructor = Child;
    }
})();
extendClass(Person, Employee);
Employee.prototype.getPosition = function(){
	return this.posititon;
}

var roy = new Employee('로이', 30, 'engineeer');
console.dir(roy);
extendClass는 자바스크립트 코드 상에 단 한 번만 구현하고 이후로는 지금까지 배웠던 과정들을 매번 떠올릴 필요 없이 extendClass라는 함수를 호출해주기만 하면 됩니다.
여기서 조금만 더 관심을 가지면 인스턴스의 value들 역시 상속 구조를 활용하면 좀 더 간단한 구현이 가능합니다.
this.name = name || '이름없음';
this.age = age || '나이모름';
이 두 개의 같은 프로퍼티를 가지고 있으니 하위 클래스에서는 this.superClass(name, age)와 같이 호출할 수 있다면 더욱 편리할 겁니다.
이것을 코드로 구현해보겠습니다.
function Person(name, age) {
	this.name = name || '이름없음';
    this.age = age || '나이모름';
}

Person.prototype.getName = function() {
	return this.name;
}
Person.prototype.getAge = function() {
	return this.age;
}


function Employee(name, age, position) {
	this.superClass(name, age); // superClass로 상위 클래스 호출
    this.position = position || '직책모름';
}

var extendClass = (function() {
	function Bridge(){}
    return function(Parent, Child) {
    Bridge.prototype = Parent.prototype;
    Child.prototype = new Bridge;
    Child.prototype.constructor = Child;
    Child.prototype.superClass = Parent; // 추가
    }
})();
extendClass(Person, Employee);
Employee.prototype.getPosition = function(){
	return this.posititon;
}

var roy = new Employee('로이', 30, 'engineeer');
console.dir(roy);
프로토타입에 superClass 매서드를 만들어서 Person을 담았습니다. 그래서 this.superClass로 name, age를 변수에 넣으면 자연스럽게 우리가 원하는 결과를 얻을 수 있게 됩니다.
ES6에서는 굳이 extendClass라는 함수를 직접 만들지 않아도 자바스크립트 내장 명령으로 손쉽게 클래스 상속을 구현할 수 있습니다.
class Person {  // class Person 생성
  constructor (name, age) {
  	this.name = name || '이름없음';
    this.age = age || '나이모름';
  }
  getName () {
  	return this.name;
  }
  getAge () {
    return this.age;
  }
}

class Employee extends Person {  // Employee는 Person을 extends
  constructor (name, age, position) {
  	super(name, age);  // super 명령어로 상속받는다
    this.position = position || '직책모름';
  }
  getPosition () {
  	return this.position;
  }
}
그럼에도 여기까지 오면서 우리가 그동안 배웠던 것들을 하나하나 써먹을 수 있었기에 개념을 이해하고 써먹으면서 전반적인 흐름을 이해할 수 있게 되었다고 생각합니다.
'Study > JavaScript' 카테고리의 다른 글
| 자바스크립트 중급 (3) (0) | 2022.02.09 |
|---|---|
| 자바스크립트 중급 (1) (0) | 2022.02.07 |
| 코어 자바스크립트 - 프로토타입(Prototype) (0) | 2022.02.04 |
| 코어 자바스크립트 - 클로저(Closure) (0) | 2022.02.03 |
| 코어 자바스크립트 - 콜백함수 (0) | 2022.02.03 |
